If you read my last article on The Rugby Site, you will already be aware of the sequence from the second Test between New Zealand and Ireland in Wellington with which the piece concluded.
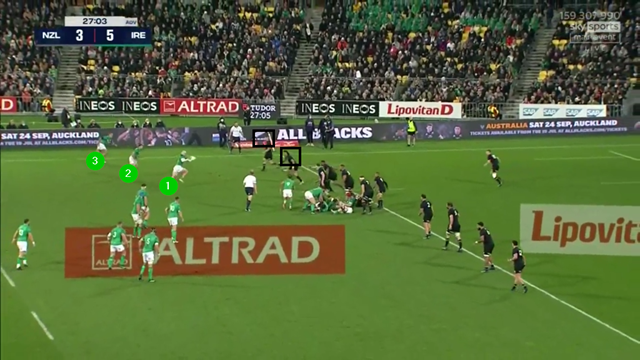
The men in green were playing with a man extra, with All Blacks’ left wing Leicester Fainga’anuku off the pitch on a yellow card, but they refused the temptation to play for an overlap on the open-side of the field. Instead, they chose to keep the ball in a 20-metre corridor between the left touch, and an imaginary line drawn outside the near 15-metre marking.
Ireland zigzagged for seven phases and 45 seconds before Johnny Sexton popped a clever kick into the blind-side ‘box’ deep inside the Kiwi 22. The outcome was wholly positive, with Ofa Tu’ungafasi yellow-carded for another early tackle without the ball. It could easily have been worse, with Garry Ringrose beyond the last defender and looking to have a clear run to the goal-line. Worth a penalty try? Maybe.
In fact, the sequence gestures towards a much more deep-seated problem, because Ireland had no difficulty in creating and exploiting short-sides against New Zealand throughout the entire series.
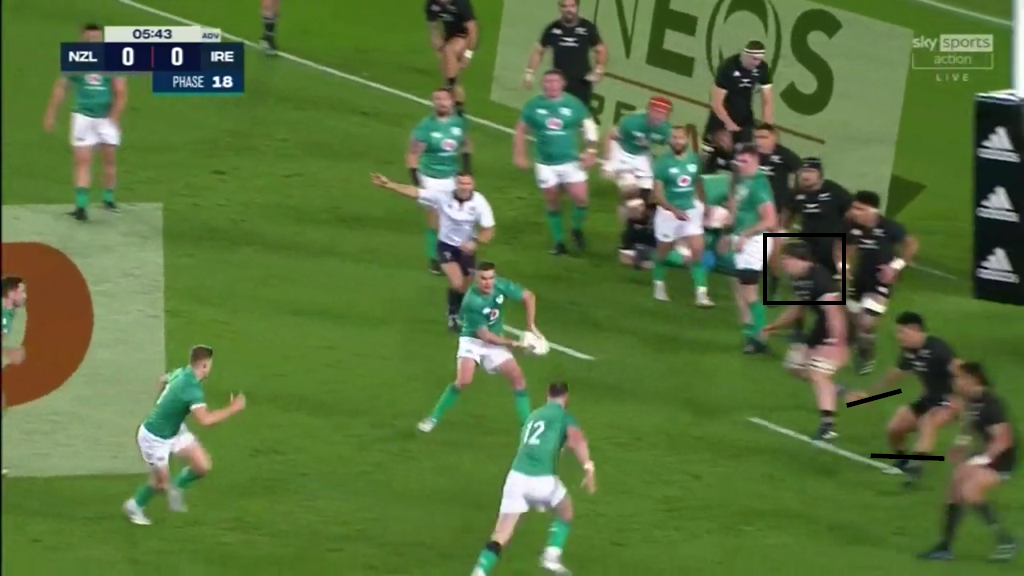
The simplest example occurred at the final Test in Wellington. We pick up the action after Ireland have just moved the ball across the full width of the field from a first phase lineout on their right:
On the way back from the side-line on second phase, Ireland are not looking to play any further out than that invisible line five metres beyond the near 15m ‘hash-mark’. As the camera shot widens, it is easy to see that the men in green already have manufactured a favourable attacking situation:
All three of the Irish back three players (number 14 Mack Hansen at first receiver, with Hugo Keenan and James Lowe outside him) have remained on the short-side, opposed by only two All Blacks (Rieko Ioane and Will Jordan). With Hansen’s extra passing ability, the conversion is quite straightforward:
The lack of communication and urgency in that area would have been worrying from the New Zealand point of view.
It was not as if the All Blacks had not been given fair warning. The series had started with the following try at Eden Park, again from a lineout starter:
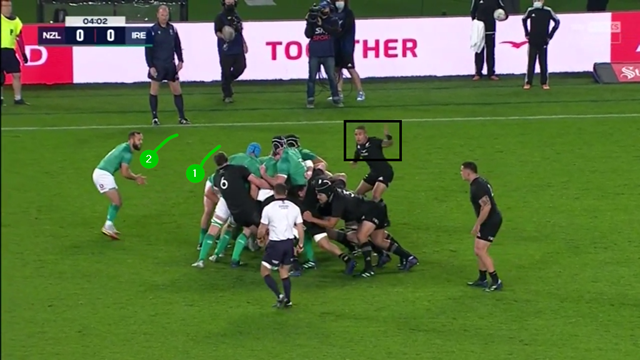
This is a much longer and more complex example, with the sequence lasting for almost two minutes and 18 phases in total. The beginning is symbolic: New Zealand number 9 Aaron Smith is already calling for help when he sees Ireland bending their lineout drive to the blind-side, with hooker Dan Sheehan and scrum-half Jamison Gibson-Park looking to break off in that zone.
The next series of phases zigzag between the left touchline and the invisible marker 20 metres inside it. The idea is to overload the tacklers in that sector with the repeated task of committing to tackles, getting up off the ground and resetting at the line.
The following table illustrates the division of workload for the nominated short-side defenders in the course of the sequence:
| Defender | No of tackles |
|---|---|
| Scott Barrett | 6 |
| Brodie Retallick | 4 |
| George Bower | 1 |
| Beauden Barrett | 10 |
The figures for Scott Barrett and Brodie Retallick are especially startling. They have been required to complete as many as 50% of the tackles they might expect to make in the entire game, within only two minutes and one cycle of play.
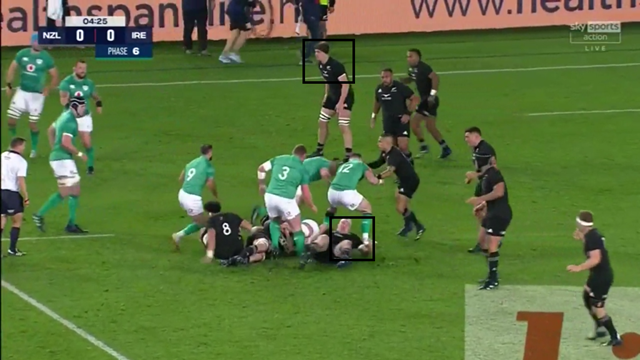
First Peter O’Mahony sends a pass inside for Tadhg Beirne to crash into Barrett, who is immediately knocked down at the ensuing cleanout. Then Retallick tackles Caelan Doris as the ball is moved back outside the 15m line: three heavy bits of contact in two phases – it is exhausting work.
Ireland promptly rinsed and repeated on the next couple of plays, with both ‘Scooter’ and ‘Guzzler’ committed to more hard contact efforts – Barrett on Andrew Porter, Retallick on Doris/Sheehan (again):
It is plain to see from the examples that the attack is far more flexible: it can change the ball-carrier and vary the point-of-contact in a confined area, while committing the same defenders to the tackle and steadily wearing down their resistance.
Once again, it is Barrett in on the tackle with Retallick trying to contest the ball afterwards, this time after a carry by left wing James Lowe.
When Ireland finally decided to move the ball to the wide side of the field on 18th phase, it was Scott Barrett who was the nearest Kiwi forward to the play on the try-scoring phase:
After all of the involvements he had made on the previous phases, it is no surprise that ‘Scooter’ can hardly raise a trot, let alone a gallop in support of his backs as the ball is shifted wide to Keith Earls for the try.
Summary
New Zealand’s reluctance, or sheer inability to adjust to what Ireland were doing in the course of the recent series would be a concern for All Blacks supporters. The men in green were either scoring tries on the short-side, or exploiting the same space with the kicking game, in all three Tests. The accuracy of their ball-handling and passing in that short area 20 metres in from the side-line demonstrated how creativity can still be applied without going wide-to-wide on attack. Identifying ‘repeat defenders’ will do the trick every time.


.jpg)
.jpg)