The World Cup is just around the corner, but we’re lucky enough to have an exceptionally exciting game of world-class rugby to look forward to tomorrow.
Steve Hansen’s New Zealand welcome Australia to Eden Park as they look to hold onto the Bledisloe Cup, and the sub-plots are copious.
Dan Carter’s final match for the Kiwis on home soil, Richie McCaw’s record-breaking 142nd cap, whispers of New Zealand being in decline, Michael Cheika’s hopes that he truly has added steel to this Australian squad.
We will learn huge amounts tomorrow, but the focus in this article is in the same place as before the first Bledisloe Cup game in Sydney a week ago, one that saw the Wallabies secure the shortened Rugby Championship.
The breakdown and ruck area was pivotal in deciding the outcome of that game, and tomorrow will be no different at Eden Park. If Cheika’s men can make the Auckland ground their ruck paradise, they have a genuine chance of breaking a run of defeats there that extends back to 1986.
In looking towards what should be an epic encounter tomorrow, we review what went on at the breakdown last weekend in Sydney and the lessons both sides will have learned.
Pocock pounces
It’s not difficult to imagine Hansen breathing a sigh of relief when he saw David Pocock’s name on the Wallabies’ bench this weekend, though one feels that Richie McCaw would have loved another face-to-face with the Brumbies flanker.
Pocock was masterful at the breakdown in Sydney and the Australians will have to work extremely hard to replicate his effectiveness at Eden Park, before the man himself enters the fray from the bench.

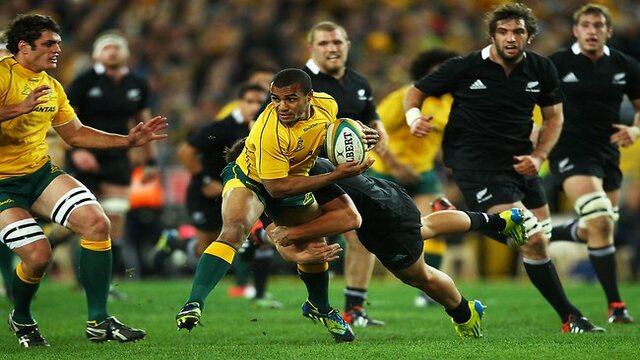
With barely four minutes gone last weekend, Pocock made his first steal of Kiwi possession. We see above that he gets a little bump in on McCaw after the New Zealand captain has tipped a pass on to Owen Franks, giving himself the tiniest initial advantage.
It might be argued that Pocock approaches the ball from the side here, rather than through ‘the gate’, and a closer look at his line would back that up.

However, the important thing here is the picture Pocock paints for referee Wayne Barnes. Within a split second of his approach, the Wallabies openside has got himself into the below position.

In this moment, Pocock looks like he has come through the gate. The way in which he has shaped his body, with feet pointing up the pitch, paints that lovely picture that Wayne Barnes is seeing.
Pocock beats McCaw to the ball and the key is his immediate targeting of the pill. There’s not even a hint of a hand on the ground to support his body weight, just a direct clamp onto the ball in a position that keeps Barnes happy. Stunning speed and technique.
Less than two minutes later, Pocock had steal number two of this game.

While this is all about Pocock’s brilliance at the breakdown again, it’s also symbolic of the Kiwis’ problems in this game and generally in recent times. They’re still making gainline busts, but their ability to get to rucks on time and effectively has not been up to scratch.
From the Wallabies’ point of view, it’s an excellent recovery after a linebreak, with the superb Dean Mumm playing his part.

Take another look at Mumm’s running line as he tracks back and notice how he just gets in Kieran Read’s way as the number eight follows Nehe Milner-Skudder. It’s totally deliberate from Mumm and its buys Pocock another split second.

Again, the ball focus from Pocock is exceptional and it’s one of the reasons he often gets clean turnovers where others might win a penalty. The 27-year-old’s extraordinary athletic quality is part of it, his core strength, flexibility and arm strength marrying with his frightening clarity of thought in these instances.
Pocock gave away a penalty at ruck time in the opening 10 minutes, but for us it was a smart one to concede.

This comes after Sonny Bill Williams goes extremely close to scoring, and the feeling is that quick ball for the Kiwis here would result in a try. Pocock senses the same and deliberately infringes to shut the play down.
No card? It’s hard not to think that Pocock’s success with two previous turnovers is not in the referee’s mind here. A yellow is dished out to the Wallabies when Aaron Smith quick-taps the penalty and gets tackled by an offside Sekope Kepu, after which Dan Carter knocks over three points.
It’s clearly not an ideal outcome for Cheika’s men, but it’s certainly better than the concession of an early try. Pocock’s intervention was a smart one in our books.
There was another really similar contribution from Pocock just before half time and again it’s hard to see how the Kiwis wouldn’t have scored but for his actions.

Dane Coles makes the big break in those ‘championship minutes’ that typically see the Kiwis scoring a morale-crushing try, and quick ball from the subsequent ruck is likely to see them cross the whitewash.
However, Pocock makes the tackle and bounces off the ground as though it’s a trampoline, immediately looking to get over the ball. He shrugs off Carter’s initial rucking attempt before succumbing to being smashed by Franks and Jerome Kaino, but he’s added just enough time to allow his teammates to recover their defensive line.
Apart from these momentum-defining moments, Pocock was a general pest on New Zealand’s ball, constantly fighting to get his hands on it at the breakdown or counter through their rucks.
Australian plough-truck
While Pocock was busy wreaking havoc on the Kiwis’ possession, the rucking from Australia in attack was nothing short of exceptional. It’s worth re-watching the 80 minutes of this game just to study Cheika’s men as they clear bodies away from the ball.

The clip above shows us the very first ruck of the game in Sydney and provides us with a taster of what was to come. The Wallabies win their own restart after an error from an out-of-sorts Brodie Retallick, before Read looks to snaffle it back post-tackle.
Mumm reacts in a tone that lasted for the entire game, his clear-out being sharp, snappy, effective and featuring that little bit of venom as he targets Read around the neck to remove him as swiftly as possible.
Below, we get the sublime Scott Fardy absolutely smashing Tony Woodcock away from the ball, this one coming directly after Pocock’s first turnover.

Cheika has added an aggressive edge to this Australian team and it’s extremely apparent in the improving quality of their rucking. That underlying attitude of clearing men away relentlessly is key: ‘these guys are getting nowhere near our f**king ball’.
When that’s married to the technical quality Australia showed last weekend, the results are spectacularly effective.

Above, we see another standout effort, this time from Mumm and James Horwill after the Kiwis cough up the ball. Woodcock has thoughts of another immediate turnover, but the Wallabies locks absolutely blast him out of there.
There’s another beautiful contribution from Mumm below, as Luke Romano looks to run a blocking line in front of him, delaying his arrival to the ruck.

Rather than throw his arms up in despair and appeal to the referee, Mumm reacts by fighting off Romano and making up the advantage Woodcock has over him in terms of being closer to the ball.
Mumm gets an exceptionally low body position, winning the shoulder battle against Woodcock and securing the ball. Stunning.
Below, it’s more about the venom and aggression from Will Skelton as Dane Coles looks to pilfer.

Skelton targets the back of Coles’ neck here, finding the spot that he feels will ensure Coles instantly gives up on his idea of stealing the ball. The New Zealand hooker was understandably unhappy with Skelton here, but it underlines the Australian attitude towards the Kiwis’ effort to slow their ball.
The game is littered with other fine examples of Wallaby rucking, both in terms of the aggression and the range of techniques used to clear bodies away.
McCaw’s frustrations
With that in mind, it’s clear why Richie McCaw never really got a handle on the Australians’ ball, never quite managing to be a decisive influence in the breakdown battle, as he so often is.
There were still some brilliant moments from the veteran openside, but the Australians will have been pleased with how they dealt with McCaw.

Cheika’s men just rarely allowed McCaw to get a glimpse. We see him in prime position above, but Pocock hurtles into the breakdown to smash the Kiwi captain away, Horwill aiding the process.
Below, it’s Matt Giteau ensuring that McCaw doesn’t even think about bouncing back up after the tackle on Israel Folau.

Giteau arrives in to clear McCaw with his left shoulder, showing his intelligence by driving his right shoulder into Sonny Bill Williams to make sure the centre has no thoughts of competing either.
The Toulon man was sensational in Sydney last weekend and Test rugby is a far better beast with Giteau involved.
Overall, this was the story of McCaw’s night at ANZ Stadium, as the Wallabies consistently hit him before he even had a sniff of the ball. There was lots of off-the-ball stuff with McCaw around the rucks too as Cheika’s men looked to add to his frustration.

The example above was quite typical, as Stephen Moore winds himself up with McCaw, looking to hold him back and bring out a reaction from the legendary openside.
McCaw can give as good as he gets, however, and is well built for this tactic from the Wallabies. Indeed, McCaw’s one breakdown turnover came within seconds of him initiating a minor bout of handbags with Pocock.

It’s only a brief tussle between McCaw and Pocock, but the Kiwi skipper looks to be reminding the Australian back row that he’s more than up for the challenge.
To back that impression up, McCaw wins a turnover at the very next breakdown, following Aaron Smith’s box kick on top of Israel Folau.

Pocock is in the vicinity too, but this time it’s McCaw who wins the race to the ball, getting his hands on it before going off his feet. Barnes in this instance said he was happy McCaw had won the ball legally before losing going to ground, so play continued.
It was a brief success for McCaw – and something the Kiwis will hope to see a lot more of tomorrow – but was not symbolic of the game as a whole.
Instead, McCaw was left frustrated at the breakdown as the Australians did just enough to ensure that he and his teammates didn’t have a consistent impact.

Above, we see McCaw desperately looking to win the ball and doing a superb job of slowing it. Michael Hooper and Mumm just about do enough to clear McCaw away, but the outcome for the Wallabies is a much happier one than in similar first-half instances when Pocock slowed the Kiwis’ ball.
A phase after McCaw’s effort above, Nic White snuck through for the try that all but sealed the win. The New Zealand captain was close, so close, but it wasn’t to be his night in the rucks.
Hooper hits
In our preview of the ruck battle last week, we spoke about Australian openside Michael Hooper being more of a power player than a groundhog and that impression was somewhat backed up in Sydney.
As an international seven, Hooper is obviously effective at the breakdown and we saw as much against the Kiwis.

He made one turnover on the ground against the Kiwis, although it’s one Hansen’s men were very displeased with. Barnes allowed play to roll on but Conrad Smith and his teammates argued that Hooper had been resting on his hands before winning the ball.

The replays appear to support that argument, though it’s not as easy to spot in real time from Barnes’ position, with McCaw’s body almost serving to block the referee’s view of where Hooper has placed his hands.
The turnover stood and Hooper has his big breakdown moment. The Waratahs flanker did concede a penalty in a later attempt to win possession on the ground, as we see below.

Hooper misses with his first shot at the ball but opts to have another cut at it just as he loses his feet, which Barnes pings as a penalty offence.
That misdemeanour aside, Pocock contributed well to the rucks in Sydney, clearing bodies away effectively in attack and providing security over the ball in moments like the one below.

McCaw looks to bust through Hooper and disrupt, but the Wallabies flanker braces himself superbly, using his grip on the tackled player to ride the challenge of McCaw and provide a safety net for scrum-half Nick Phipps.
The challenge now for Hooper is to compensate for the absence of Pocock from the starting team in Eden Park, helping his side to again frustrate the Kiwis when they are in possession.
We spoke about Hooper’s powerful tackling last weekend before the first Bledisloe Cup game and it certainly came to the fore in Sydney. While he looks to add to his breakdown competitiveness, Chieka will hope Hooper never loses this side of his game.

The memorable tackle above, which signalled the end of the first half, comes four phases after Pocock had initially managed to slow the ball down following the break from Coles.
It underlines how important Hooper’s power and ferocious work-rate is to the Wallabies, as Julian Savea gets the ball in a position from which we’ve seen him score so many times.
Hooper doesn’t accept a concession, however, and though he gets his head on the ‘wrong’ side of the tackle, it’s a superb bit of contact on the powerful Kiwi wing. Again, Hansen’s men were denied that try they so often score just before the break.
Not content only to prevent tries in the key moments, Hooper used his tackling to help create the game-clinching try from Nic White.
Again, it’s a powerful hit from Hooper – this time on Milner-Skudder – but the most impressive thing is the manner in which the Australian openside finds his feet again post-tackle and causes enough trouble to force the ball loose from the ruck.
From there, he’s chasing the bobbling ball with hunger, grabbing it and finishing a brilliant contribution with really clean ball presentation. The Wallabies go back on the attack and score nine phases later. It started with a hit.
Bledisloe breakdown II
With Pocock starting from the bench, the Australians are deprived of their greatest breakdown threat for a portion of the game, leaving the onus on capable players such as Hooper and Scott Fardy to lead the charge.
In terms of their attacking rucking, Mumm is a loss but again there is more than enough quality in their starting XV to do a similar job to last weekend. It’s a team duty and Cheika will have hammered home the need to starve the Kiwis of turnover ball.
For Hansen’s men, getting to the scene of the breakdown more swiftly is essential, both in defence and attack. The delay in resourcing attacking rucks we’ve seen in recent weeks simply can’t be repeated, while McCaw will need his teammates at their sharpest around him if he is to get back on the turnover train.
We’d back to the New Zealanders to improve in this area, and many others, meaning we’re in for another entertaining clash in Eden Park.