SET-PIECE ATTACK offers teams a wonderful chance to create try-scoring chances, given that the side in possession can pre-plan their moves and exploit the space created by the forwards being restricted to one small area of the pitch.
New Zealand gave an excellent demonstration of exactly that in their 36-13 victory over England last weekend, blitzing Stuart Lancaster’s side with three line-out attacks in the opening 15 minutes of the encounter, two of which led to tries. While the third effort didn’t result in a further five points, the Kiwis’ superb start to the Test match dampened any early English optimism, while also providing them with a 12-point cushion on the scoreboard with less than a quarter of the game elapsed.
Julian Savea’s first try
While this wasn’t the cleanest of tries from New Zealand, there were many elements of high quality that went into constructing the score. The line-out actually stemmed from an England error [Mike Brown kicking directly into touch after bringing the ball back into his own 22], a somewhat symbolic incident in the second minute of play. Kiwi hooker Dane Coles hits Brodie Retallick towards the front of the line-out, and with England competing in the air through Joe Launchbury, it provides the attacking team’s pack with an ideal chance to get their maul moving forward.
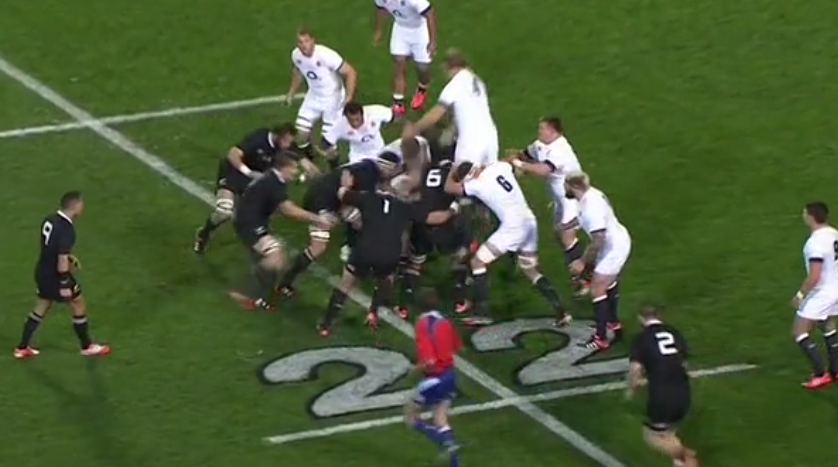
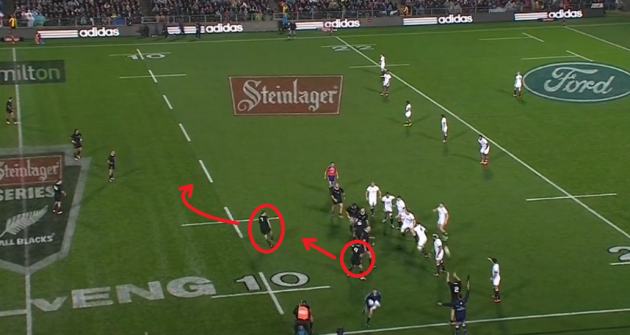
In the image above, we see New Zealand beginning to launch the maul into the space opened by England’s decision to compete for the line-out throw. With scrum-half Aaron Smith screaming “maul, drive it,” the forwards do exactly that. It’s by no means the most impressive driven maul of all time, but New Zealand manage to eke out a few crucial metres and get the attack onto the front foot. From there, the backs take over, starting with Smith’s stunning pass.
It’s a remarkable piece of skill from the Highlanders half-back, a laser beam of a pass over a distance of approximately 20 metres and with an incredibly low trajectory. Smith’s rocket means the Kiwis are suddenly in midfield and running at the English defence. The length of the pass also cuts out any possibility of Billy Vunipola or Freddie Burns [who start close into the maul] getting across the pitch to first receiver Ma’a Nonu. As we see below, that forces inside centre Kyle Eastmond to commit to his opposite number.
In turn, that means Eastmond can’t drift out onto Aaron Cruden, who has taken a line behind Nonu and is available to run into the space between the England centres. While the pre-contact pass from Nonu doesn’t arrive to free Cruden to run into that gap, Eastmond is passive with his tackle attempt, allowing Nonu to release the ball even after being engaged in contact. Being aware of the bad situation England are in defensively, Eastmond could have unleashed himself into the hit on Nonu, attempting to snuff out the danger before it could develop any further. Unfortunately for Lancaster’s side, that hit does not transpire and Nonu is free to offload messily, before Cory Jane sweeps up the ball and feeds Smith, who has worked hard to follow play.

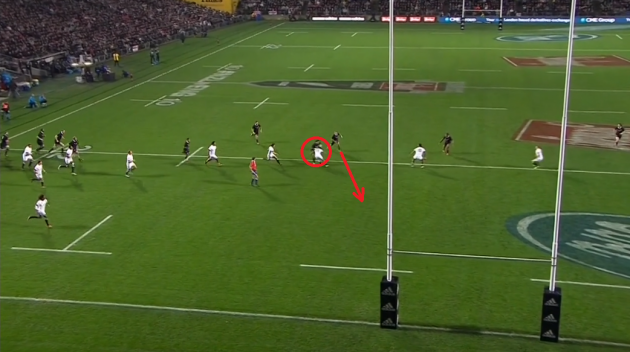
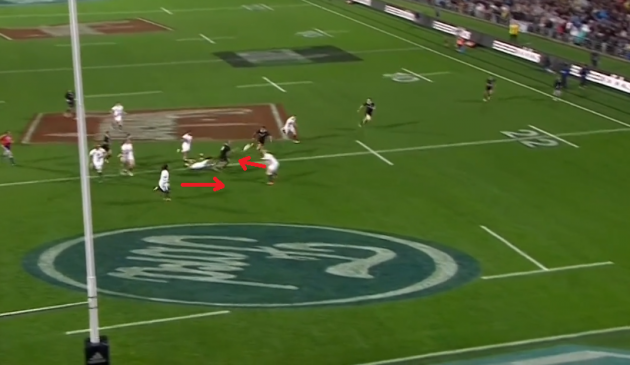
At this stage, Chris Ashton and Manu Tuilagi have come infield in an attempt to shut down the play or even regather possession for England, but the end result is a congestion of defenders in one tight area of space on the pitch. Smith’s wonderful pirouette out of the challenge of Ashton is followed instantly by another remarkable pass, this time one-handed. Such a pass likely makes up part of the scrum-half’s training regime, and he can rely on the skill under pressure as a result. Mike Brown is left utterly stranded as England’s last defender and with a 2-on-1 scenario, Ben Smith and Julian Savea are never going to be stopped
Julian Savea’s second try
Just over four minutes after Savea dotted down his first try from New Zealand’s opening line-out attack of the game, the Kiwis created another score from the same source and finished by the same man. While the opportunity for New Zealand to launch that first score came about as from an error by Mike Brown, the second try stemmed from a superb restart by Aaron Cruden.

Having conceded a penalty to England, Steve Hansen’s men were intent on getting the ball back as swiftly as possible. Fortunately for them, Cruden’s restarts short to the right are among the best in the world. Kieran Read chases well and forces the ball loose as he competes with Joe Launchbury, before his teammates swarm in on Courtney Lawes to force the Northampton lock into touch. From the moment the assistant referee signals for a line-out to when Dane Coles throws the ball in, just 13 seconds elapse. The Kiwis are focused on getting the ball back into play as quickly as possible, striking at England as the visitors organise themselves.
The ball boy is still on the pitch as Coles throws to Read, while Richie McCaw is already moving away from his starting ‘half-back’ position behind the line-out. Simultaneously, Aaron Smith moves from the front of the line-out formation into the hole vacated by McCaw.
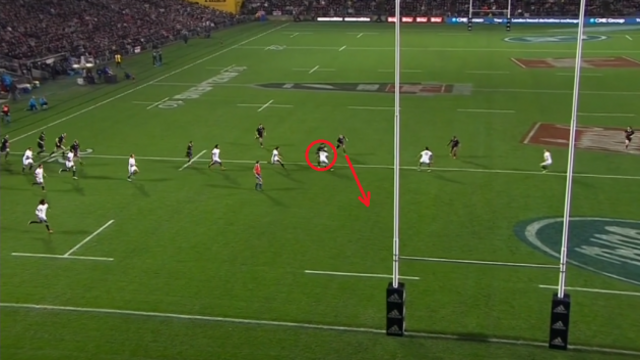
What it all means is that New Zealand suddenly have an extra man in their backline attack as McCaw takes on the role of first receiver. Dylan Hartley does look to track the openside from a similar starting position behind England’s line-out, but he’s already three steps behind. Ben Youngs, meanwhile, is in his usual defensive position, marking the blindside channel in case New Zealand look to attack back down that space [which they did later in the half with major success]. With the ball in McCaw’s hands, Ma’a Nonu arrives on a flat line, straightening the Kiwi attack and forcing Kyle Eastmond to make another demanding defensive decision.
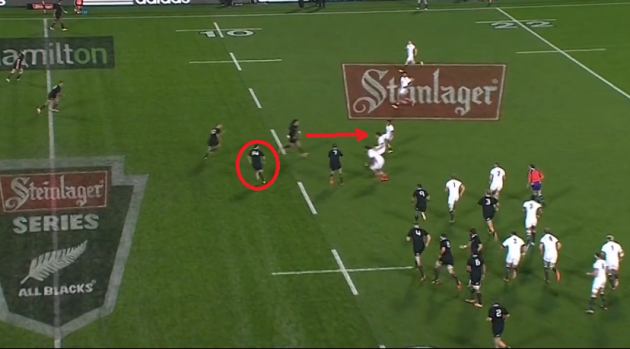
The presence of right wing Cory Jane [circled above] in behind McCaw adds another stress for Eastmond, providing another potential target for the openside’s pass and another reason for the Bath centre to stay tight to Freddie Burns. That’s exactly that Eastmond does, initially lining Nonu up despite Burns having the Kiwi 12 covered. When the image is frozen, it is of course easy to pick these things out but in live play, the amount of movement from New Zealand [Cruden is drifting wide behind Nonu too] makes it a hugely demanding decision.
McCaw releases the pass behind Nonu to Cruden, and as we see below, the decoy running of Nonu and Jane has been enough to draw Eastmond in, leaving the space on his outside shoulder for Cruden to run into.
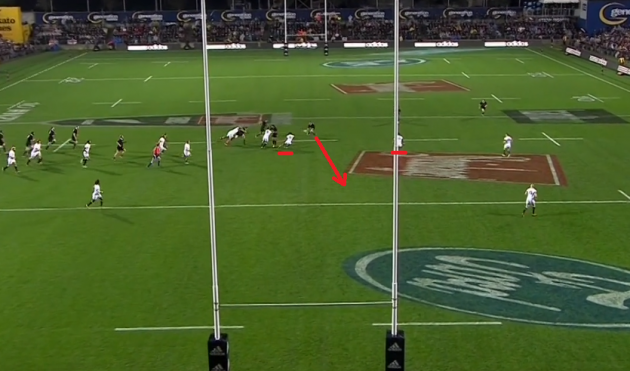
It’s worth noting the space between Eastmond and Manu Tuilagi in the instance above, which echoed a major problem for the pair in the first half before the Bath man was withdrawn.
While Eastmond’s decision to initially bite in exaggerates the spacing here, it was an issue for the entire 40 minutes when England had to defend. We don’t know if Eastmond was getting any communication from Burns inside him, reassuring him that there was no need to bite in, but we repeatedly saw this hole open up in between Eastmond and Tuilagi.
Bath coach Mike Ford has suggested that Eastmond was not individually responsible for the first half defensive errors and, while he is obviously slightly biased, there is certainly truth in that assertion. Inside centre is a difficult position to defend on line-out attack, with New Zealand’s brilliant movement taking full advantage of that. Returning to the play at hand, Cruden makes the scything break and eventually forces Mike Brown to bite in on him, with Marland Yarde struggling to get across and allow the fullback to drift out onto the attackers wider out.
As pointed out by the New Zealand-based commentary team, Cruden has the option of hitting Malakai Fekitoa short off his left shoulder as Brown bites in, but opts to go for the long pass to Savea out wide. While the pass is not as accurate as Cruden would have intended, the sensational pick up and finish by ‘The Bus’ compensates and sees a wonderful line-out attack end with five deserved points.
Are England especially vulnerable to lineout attacks? How would you coach your backs to defend in these scenarios?
Read part 2 tomorrow – we’ll have a look at what came next – the All Blacks best attacking move of the test.


.jpg)
.jpg)