How to make good choices after the break
After Ireland defeated Australia in the final Test of a tense and closely-fought series in June, head coach Joe Schmidt bemoaned the fact that so few of Ireland’s line-breaks – 22 in total over the three matches – had resulted in tries:
“There were some super line-breaks…but they’re tough to score against in behind, they work really hard.”
Ireland only scored three tries in the course of the series, despite dominating territory and possession for the most part. An average of one try per game (and a conversion rate of one in seven chances) does not often provide the winning edge in professional rugby.
The same had happened previously after the 2017 Six Nations game against Wales. Ireland forced the defence to make 185 tackles during the game, but despite making eight line-breaks they failed to score a try.
Joe Schmidt’s comment highlights a critical aspect of attacking play. Coaches spend a great deal of their time working out how to break the first line of opposition defences, and counting the line-breaks created, but is an equivalent amount devoted to the processes through which those chances are converted?
What happens in the time and space after a break has been made is just as important, if not more so, than the initial breach.
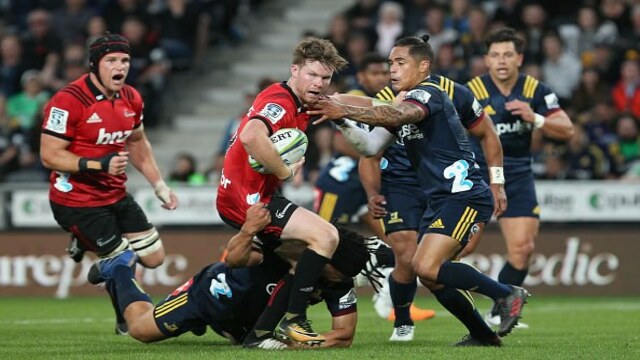
The recent Super Rugby encounter between the Crusaders and Highlanders contained some revealing examples of the Do’s and Don’t’s in these scenarios, in the process reinforcing the truths about support play embedded in Wayne Smith’s superb coaching session.
The best example of accurate and determined attacking play after the break occurred in a Highlanders’ counter-attack just before half-time:
After the break is made by the Highlanders’ number 10 Lima Sopoaga, he receives the support of two players, the All Blacks’ two Smiths – #9 Aaron and #15 Ben. There are three identifiable key moments in the sequence.
The support of Aaron Smith comes from an unpromising beginning. The half-back has just been knocked down near the side-line…
.png)
…and is not even in shot as the break occurs. Smith ‘reloads’ on his own 40m line, triggering a sustained 50 metre sprint to appear on Sopoaga’s left shoulder as the shot widens at 34:52. It is some effort, well above and beyond the line of duty.
The support player on Sopoaga’s right is Ben Smith, and his action at 34:52 is the foundation of the second key moment:

At this juncture, Ben adjusts his support line from flat to deep and drops in behind Sopoga’s right shoulder, while at the same time scanning to pick up the crucial defender on the play – Kieran Read coming into view at the top of the screen. It is Read that Smith will have to beat to get over the try-line.
The third key moment shows why the play can continue positively with ball in hand:

The two Highlander support players are both closer to the ball than any of the Crusader cover defenders, they are both ‘inside the circle’ and so the play can continue without any need to take contact.
Ben Smith has the patience to give Sopoaga (as the ball-carrier) the time and space to make the decision where he wants to go, then fills the space between Richie Mo’unga and Read to convert opportunity into try. It is superb work from beginning to end.
The Crusaders’ fourth try also showed accurate decision-making after the break, although the result was very different:
After the Crusaders’ number 10 Richie Mo’unga receives the ball near halfway, an alternative support situation has occurred, one which Mo’unga again assesses correctly:

The three players ‘inside the circle’ are all in blue, which means that all of Mo’unga’s support has either been blocked out or is too far away for a pass to be made. The first five-eighth can either take contact or kick, and he chooses the latter, backing his speed to score the try.
Two similar examples of support after a break around the end of the lineout on first phase illustrated both ‘how to do it’ and ‘how not to do it’!
The attacking play has a forward (hooker Andrew Makalio) dishing the ball inside to the blind-side wing, #14 Seta Tamanivalu. The main point of interest in terms of support-after-the-break is in the action of Crusaders’ number 12 Ryan Crotty.
Crotty picks a line which ensures that he drops underneath his immediate opponent Sopoaga, shifting from a flat to a deep support position:

It’s a subtle but important adjustment, and it enables the Crusaders to convert the chance a couple of phases later.
Here is an instance of failed support after the break. The first phase break is engineered in similar fashion to the Crusaders’ example, with an in-pass from a forward (Liam Squire) to the blind-side wing Waisake Naholo.
But although the principal support player (Rob Thompson) is running the same line as Crotty, he fails to make the right adjustment after the break.
Instead of chopping in behind Naholo, at the critical moment he stays flat and overruns the ball. In fact, he is running on an angle away from Naholo and increasing the difficulty of the pass rather than reducing it:

Summary
Coaches have become used to measuring attacking efficiency by counting the number of line-breaks their teams create. However, the gap between creation and conversion may be rather bigger than it appears. So the question arises – how can good coaching offer to minimize that gap?
Support play and decision-making after the break has been engineered is just as important as the ability to make the first breach.
Determination to make maximum effort to get up in support ‘inside the circle’, running the correct lines to drop in behind the ball-carrier and remain truly available, and actively letting the ball-carrier do the work and create the space for the support to exploit, are all key features.
The ball-carrier needs to have a sense of just how close his support is, and whether he needs to take contact or kick instead of keeping ball in hand.
Cumulatively, these small decisions and adjustments can make all the difference between a seven pointer and those musings about ‘what might have been’ in hindsight.
.jpg)

.jpg)